
It’s the very last week of my A-Z of a vintage girl in a modern world, how did that happen? Let’s celebrate with my first ever hair tutorial!
This post is all about wet sets, which is what I usually do on a Friday night (I know, so rock & roll), as it means my set will last for longer. I use pin curls and pins, as I’ve tried foam roller sets before, and they don’t work for me. If you know they work better for you, or you fancy giving one a go, Miss Victory Violet has a great two-part tutorial – this one tells you how to roll, and this one focuses on the brush out.
So, let’s start with what you’ll need (Cath Kidston bag optional).
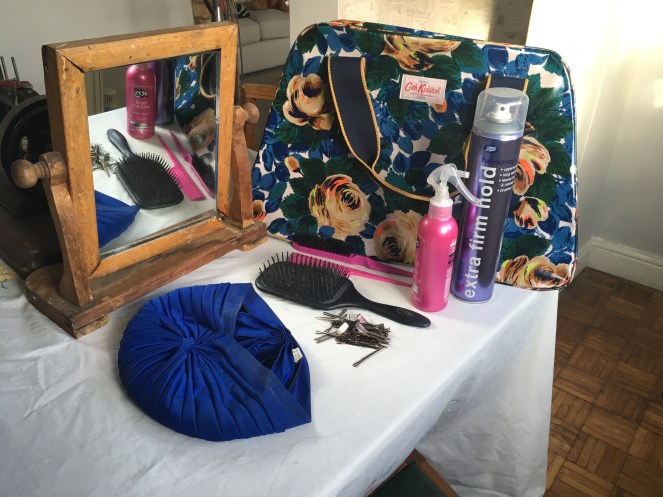
- A mirror – for obvious reasons
- Hairspray – I go for extra firm hold, because I have thick, unwieldy hair
- Setting lotion – please note, the pink bottle is just what I put it in. You can buy setting lotion from pretty much any Boots/Superdrug-type shop, and then just follow the instructions on how to dilute it
- Comb – for sectioning
- Clips – to secure your curls in place
- Back combing brush – for fun stuff
- Paddle brush – for smoothing
- Turban/scarf/other hair covering – to sleep in/cover the curls while you go about your daily life


You will also need damp – not soaking wet – hair. Well, if you’ve got a week free, you can have soaking wet hair.


Take your setting lotion, and spray it all over your head. Then, use your paddle brush and give your hair a good brushing – this will ensure your whole head is covered.


Separate a section of your hair, around an inch thick (for me, this is just behind my ear). Try to make the section as straight as you can.


Now comes the fun bit! Separate the front section into (roughly) inch long smaller sections. Then, using two fingers, wrap the top section into a curl. Then, pin it into place – you can either do a flat curl, where you pin it to your head, or a standing curl, where you just pin the bottom. As you’ll see, my setting pattern (I borrowed it from Jane Russell), uses both.


Once you’ve finished the first section, carry on until your whole head has been curled and secured – it should look something like the above.


Then, spray your hold head with setting lotion again, and follow it up with a healthy dose of hairspray.

Once you’re happy that you’ve sprayed the living bejesus out of your hair, pop on a turban or hairscarf (tutorial to come later), and secure it with a few more clips. Then, off you pop to bed. I usually sleep in a turban (my husband LOVES it) because I find it’s thicker than a scarf, making it more comfortable to sleep, but experiment a bit to see what works for you!

Zzzzzzzzz…… [Note: I do not sleep in full make up]

Eight hours later, awaken feeling refreshed and ready to face the day!

Before you do anything else, give your hair one more burst of hairspray, for luck.

Then, start by unpinning all your curls, except for your fringe (you’ll be doing something special with that).


Once they’re all unpinned, run your fingers through your curls to break them up a bit.
Now, for the backcombing!


Take a section of hair at a time (I like to start at the top and work my way down) and backcomb it until you look daft. (This will give you lovely volume when you start brushing out, I promise). And this is where your paddle brush comes into its own!


Using your paddle brush and your fingers, mould your hair into curls (as you’ll see, I brush over the back of my hand, because this reduces frizz). Brush until your hair is smooth (the longer you brush, the smoother it will become, and don’t worry about losing the curl).


I tend to do my hair in three sections – each side of my parting, and the back, and I like to start on the smaller side. I also tend to tuck the hair behind my ear, which is why the Jane Russell setting pattern works well for me. Once I’m happy with the curls, I smooth the hair down and use my lovely grips (formerly used as pin curl pins), to secure it in place.


Once you’ve styled most of your hair how you’d like, it’s time for the fringe. Unclip it, and as you’ve done before, backcomb it like nobody’s business. You then brush it out as normal – over the back of your hand to smooth, and try to make sure you don’t lose too much height.

And once you’re happy with the height, it’s time to style again (as you can see by my expression, it’s a very serious business). Use your fingers to sculpt your fringe how you’d like it (you may also need to bring the paddle brush into service again if it’s being particularly stubborn).

Then, that’s right – you’ve guessed it – one more burst of hairspray for luck!


Et voila, one completed set!
If you want to find out more about wet sets and heat sets, please read this post.

Could you post a link to the tutorial on how you wear a scarf/turban for bed please? Thank you xx
LikeLike
Hello, I’m so sorry for the late reply! I follow this Miss Victory Violet tutorial (it’s part of her bendy rollers tutorial, so scroll towards the bottom of the page 😊) xx
https://missvictoryviolet.com/2015/06/sponge-roller-setting-part-1-how-to/
LikeLike